
How to take a screenshot on a Chromebook boils down to a couple of keyboard shortcuts. We rounded up what those shortcuts are, as well as a slate of tips for what to do with them on Chrome OS.
- How to capture a full screenshot on a Chromebook
- How to upload screenshots to the cloud
- How to capture a specific area for a screenshot on a Chromebook
- How to capture screenshots in tablet mode using the buttons
- How to take full-capture screenshots in tablet mode using a stylus
- How to take partial-capture screenshots in tablet mode using a stylus
- Editing screenshots
- Using external keyboards
- Other screenshot tools
Further reading
- How to record your computer screen
- How to take a screenshot on a Mac
- How to take a screenshot on an iPad

How to capture a full screenshot on a Chromebook
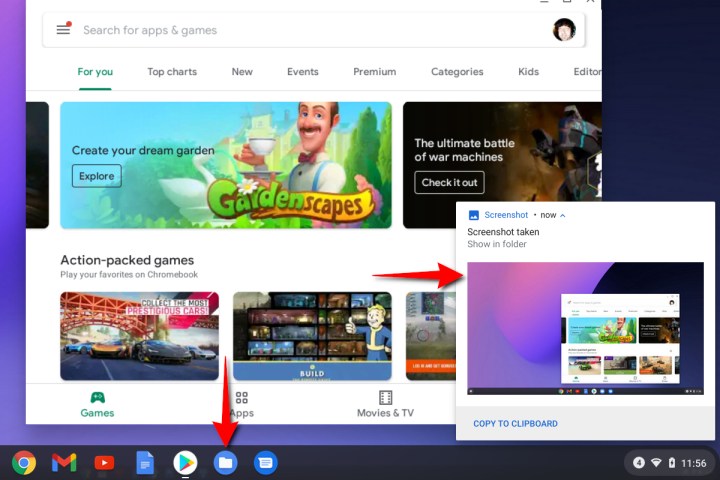
To take a screenshot of everything on your screen, press the following keys simultaneously: Ctrl + Show windows.
The latter button is typically located in the top row between the Full-Screen and Brightness down buttons, as shown above. It resembles a rectangle followed by two lines and replaces the typical F5 key found on standard keyboards.
How to upload screenshots to the cloud
Once you press both keys, a notification appears in the bottom-right corner displaying a thumbnail of your screenshot, as shown above. Selecting the thumbnail leads you to the Downloads folder, which is where all screenshots go by default, making them accessible offline. You can also access screenshots by selecting the blue Files folder-style icon on the Shelf and choosing either Images or Downloads.
Chrome OS labels all screenshots with the date and time they were captured.
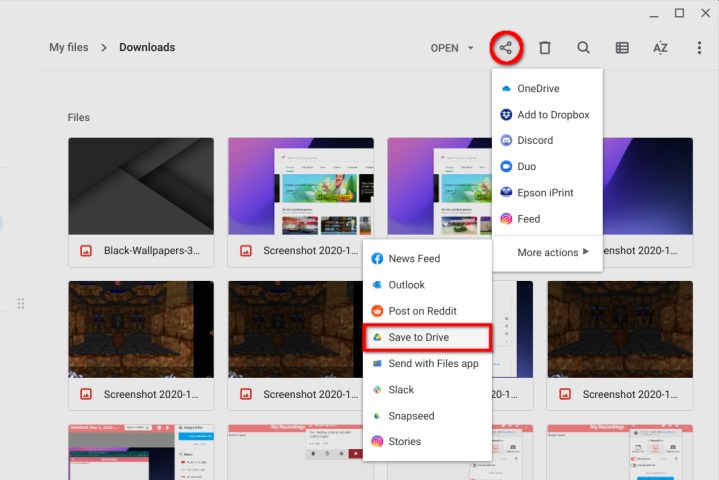
Since Chrome OS saves screenshots locally on your device, they won’t be available on Google Drive unless you manually upload them to the cloud. To do so, follow these steps:
Step 1: Open the Files app, and select either Images or Downloads listed on the left.
Step 2: Choose the screenshot you want to upload. For multiple uploads, select the Check icon on each screenshot (thumbnail view) or draw a box around the files using a mouse or touchpad (list view).
Step 3: Select the Share button located on the top-right side of the screen.
Step 4: Select Save to drive on the drop-down menu. As shown below, you can send the screenshot to other accounts, like OneDrive and Dropbox. Read our guide on how to use Google Drive for more useful tips.
If you have a Chromebook with a 360-degree hinge like a Pixelbook, skip to the “Screenshots in Tablet Mode” section in this guide for an alternate touch-based method.
How to capture a specific area for a screenshot on a Chromebook
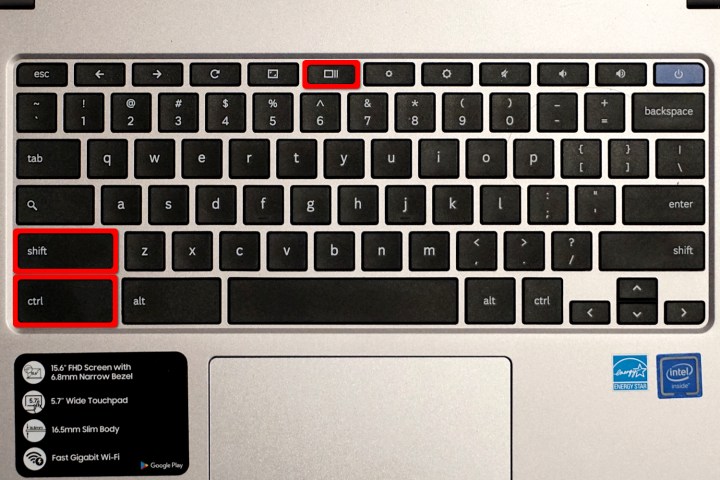
In addition to a full shot, you can create a window to capture a shot of part of the screen by using the Ctrl + Shift + Show Windows shortcut.
Step 1: Hold down the Ctrl + Shift keys simultaneously, then press the Show Windows button.
Step 2: The screen dims, and the cursor temporarily changes to a cross-hair. Use the cross-hair to start one corner of your capture area and hold down on the mouse button or touchpad.
Step 3: Drag the cursor across the screen using your mouse or finger until you create a box.
Step 4: Let go of the mouse button or lift your finger to complete the box and capture the screen.
Step 5: The captured window saves to the Images and Downloads folders, the same as a full screenshot.
Note: If you’re running Chrome OS 88 or newer and you enabled the new Screen Capture utility using flags, you’ll see the new toolbar appear at the bottom of the screen with the Screenshot and Partial buttons selected by default. You’ll also see buttons to switch over to full-screen or Window modes.
How to capture screenshots in tablet mode using the buttons
Many 2-in-1 and tablet devices running Chrome OS may not have immediate access to a keyboard. Don’t worry; there’s an easy screenshot shorthand you can use in tablet mode.
Step 1: Press the following physical buttons simultaneously: Power + Volume down.
Step 2: Your screen registers the screenshot and takes an image of the entire screen.

How to take full-capture screenshots in tablet mode using a stylus
Follow these steps to capture a screenshot in tablet mode with a stylus.
Step 1: Select Stylus (or Pen).
Step 2: Use the stylus to choose the Capture screen option. This grabs a screenshot of your entire screen.
How to take partial-capture screenshots in tablet mode using a stylus
Want to capture only a part of your screen in tablet mode with a stylus? Follow these steps:
Step 1: Select Stylus (or Pen).
Step 2: Use the stylus to choose the Capture region option.
Step 3: Use the stylus to touch and hold your starting point on the screen.
Step 4: Drag your stylus to the final point, creating a box.
Step 5: Release to capture your screenshot.
Editing screenshots
Screenshots captured by Chrome OS are ready to share, but if you need to edit them first, familiarize yourself with the built-in image editor. Here’s how to use it:
Step 1: Select the blue Files folder icon on the Shelf and choose Images or Downloads listed on the left.
Step 2: Select your screenshot to open it in the Gallery app. If it’s not your default image viewer, right-click on the file and choose Gallery from the pop-up menu.
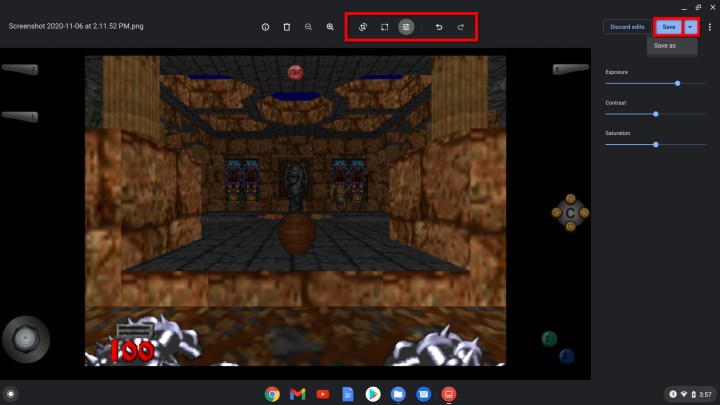
Step 3: Along the top of the Gallery app, you’ll see a toolbar with the following tools: Crop & rotate, Rescale, and Lighting filters. Each tool opens a panel on the right side, providing adjustable settings. For instance, the Lighting filters tool provides sliders for Exposure, Contrast, and Saturation, as shown above.
Step 4: In addition to the three main editing tools, you’ll see buttons to undo and redo any changes you make.
Step 5: When you’re done, click the blue Save button to save the edits to the original file.
Step 6: Alternatively, click the blue Down arrow icon to save the edited image as an altered copy.
Using external keyboards
If you’re using a Chrome OS-powered desktop (Chromebox) or an external keyboard plugged into a Chromebook, the keyboard probably uses a standard function key row instead of Chrome’s dedicated button row. Here are the Chrome OS commands that replace the typical function key commands:
- F1 — Previous page
- F2 — Next page
- F3 — Refresh
- F4 — Full screen
- F5 — Show windows
- F6 — Decrease brightness
- F7 — Increase brightness
- F8 — Mute
- F9 — Decrease volume
- F10 — Increase volume
Step 1: For capturing a screenshot, type Ctrl + F5 on a standard keyboard.
Step 2: For a partial capture, press Ctrl + Shift first, followed by F5.
Step 3: You can customize the shortcut, too, by pressing Alt + Shift + S,
Step 4: Then select Settings > Device > Keyboard. There, you can change the function of your keys.
Other screenshot tools
The built-in image tools for Chrome OS are a bit lackluster, but there are plenty of apps and extensions on Google’s Chrome Web Store to help add extra functionality. Here are some helpful picks:
Lightshot: Lightshot is a great beginner option that allows you to drag and drop a screenshot over any section of the screen. You can edit the screenshot in place, then download it or send it to the cloud. It’s easy to use and widely applicable for most purposes.
FireShot: Save an entire page as an image without multiple screenshots. You can save in multiple formats and send them directly to OneNote or email.
Awesome Screenshot and Screen Recorder: For those who want a broader, more powerful tool, Awesome Screenshot and Screen Recorder allows you to choose between screen capture and screen recording so you can also capture video whenever you want. The app supports annotations and easy blurring as well.
Editors' Recommendations
- How to keep your laptop battery healthy and extend its life
- How to uninstall McAfee
- How to screen record on an iPhone or iPad
- How to calibrate your monitor to make it better for free
- How to use a blue light filter on your PC or Mac


